Showing posts with label this {humble} home. Show all posts

this {humble} home d-i-y.

Happy Monday!!! This week is off to an awesome start. I'm feeling great and hope you are too. I have a cute This {Humble} Home d-i-y for you! The first of many, I'm sure. Last week I debuted my new studio space and over the weekend I decided the high desk needed a cute set of cafe curtains. So pull out your sewing machine and whip yourself up a pair!


For this project I choose a set of yellow vintage pillowcases with a sweet floral print. You'll also need:
-a tape measure
-pins
-a sewing machine
-matching thread
-iron
-a spring loaded curtain rod

Start by measuring your space. Underneath my desk was 50 inches wide. I didn't want my curtains to brush the floor, so I decided on 18 inch long cafe curtains. After you measure the width, decide on your pleating; the fabric can be 1.5-3 times longer. My pillow cases were 40" x 20" inches, so one case is plenty!


Starting at the opening cut all around your pillow case so you have two 40" x 20" pieces. Iron out any wrinkles in the fabric; you don't want any puckering seams!

Next you're going to seam the length of the curtains. Laying them on a flat surface, turn each 20 inch side in 3/4" and iron them flat. After you iron, remeasure and pin your seam.


Once you've measured, ironed and pinned all four seams, run those suckers through your sewing machine! You can go with a matching thread, or pick a bright contrasting color for some fun. I used a bright green.

Once you've seamed all four sides, you can now seam the bottom of your curtains. Do the same as the sides; 3/4 inches, iron, pin and sew!


The tops of the curtains are the most crucial. You want to not only make sure they fit the rod, but that the two curtains are the same length. I find it easier to sew one at a time for this part. Measure your seam 1.5 inches, iron and pin. When you sew it is best to make a mark 1/2 inch in from the open part of the seam and stick that line as closely as possible.

*note: if you want longer curtains from the beginning you can simply turn the curtains so they are 20" x 40". The cuff of the pillowcase when cut open is the perfect slot for the curtain rod! If you need more width, break out that second case. 

After sewing the last seam of the first curtain, iron it out and lay it flat. Place the second curtain on top, matching up the sewn seams. You can now measure, iron and pin that last seam for perfectly matching curtains! Sew, sew, sew, you're almost done!

All that is left is to hang those pretty curtains and enjoy! I love having a little something to cover up my plastic bins underneath the desk.


See? No more ugly plastic box! I hope you're able to make some curtains for a little spot in your home. If you have a recent sewing project I'd love to see it. Enjoy the rest of your afternoon; see you loves tomorrow. xo.

this {humble} home.

I'm so excited to be sharing a very special edition of This {Humble} Home with you all! This project was an awesome collaboration between me and Josh, and if I do say so myself, we rocked it!

In our old place in Florida, the guest room was my craft space; with a walk in closet, a dresser and built in shelves to hold all of my goodies. Sadly our new home has none of this and the guest room is just too dark!

I knew I wanted a desk in the loft where our living area is set up; it has killer light and killer views, but my folding table just wasn't cutting it.

You can see the amazing light in this picture, but this space is too big for just one teensy table.


After searching the interwebs for some inspiration, I came across Janny Pie's do-it-yourself monster desk and I knew I had to have it!

Two trips to Lowes (who were way more helpful than the other place), a quick trip to Target and a dozen measurements later, Josh and I were able to build a fantastic desk in just an afternoon, for around $150.

We had Lowes cut the MDF to ensure accuracy, but the rest of the cutting drilling and painting was done by Josh and myself. I couldn't have done this without my awesome husband, he was so encouraging and did all the heavy lifting. Thanks babe, I love you!

Look at him go! He's a pro with that drill.


The desk is made from cubbies, MDF, table legs and plywood for the skirting.


Janny Pie used larger cubbies and it was the same height all around, but I customized my desk to the space by using smaller cubbies and I dropped the table part down to accommodate my sewing machine (gotta reach that pedal!) and fitting under the window sill.

After it was complete, I shelacked it with primer and paint in a crisp white to keep it light and fun. The toughest part was finding room for all of my craft stuff; 8 of 12 cubbies are chalk full of yarn! A simple plastic drawer on wheels fits perfectly under the higher desk and is easily moved so I can reach my supplies.

I'm so very happy with This {Humble} Home project and in fact I'm sitting here right now typing to you; projects at my fingertips.

My sewing table is now the picture of perfection; happy and fun. The Liberty of London box holds all of my supplies so they're within reach.


Polly and Molly now reside on the window sill with teensy prints by Elsie Flannigan and The Noosed Kitty.


Here she is in all her glory! The cubbie desk is 6 feet long at bar stool height for plenty of working space and the sewing table is just over 3 feet.


The cubbies are a perfect spot for all of my yarn, organized by color for extra prettiness. Bins and boxes on the bottom shelves house my painting supplies, doilies and markers. The lip created by the MDF is exactly enough for my ball winder to always be out for easy yarn winding.


An old porta file is perfect for little notes and trinkets that will eventually fill the frame hanging just to the left and the top from one of candles is the perfect vessel for my embroidery floss.


I was super happy to be able to put my craft books out again; I missed my sweet little owl bookends.


The higher desk is the hub of the storage. The plastic drawer set houses just about everything and my Crosley turntable has a happy home; it's just too easy for me to craft and listen to my records now!


And this has got to be my favorite part; the view. I can stare out at the park behind our home while crafting in my studio until my heart's content!


This was a super satisfying project and I highly suggest using Janny Pie's template to customize a desk for your space. I started a trend amongst friends; my cousin made one the week after; my mom is itching for one and my friend Christy will build one this summer!

I'd love to hear what you think about This {Humble} Home project and I'd be happy to answer any questions about the building process or construction. There's still much to be done in this space; a new chair, an inspiration board and some art on the walls. But that my friends is a {Humble} Home project for another day. xo.

this {humble} home.

I'm happy to announce a new series here on The 60/40; This {Humble} Home. Making your nest a comfy, inspiring place to live is an ongoing process that I'm sure many of you, like me, take great pride in.

We move alot and with each new home I get a blank slate to make our own. Join me on this journey, as I post home inspiration, d-i-y projects, and decorating tips as I turn our house into a {humble} home.

My first {humble} home project in our new place is the dining room. It has beautiful natural light and an open floor plan to the kitchen. We've had our dining room set for several years; an eco-friendly table made out of mango wood and quirky metal chairs that were actually made for the outdoors.


Here's how the room looks when we moved in. Kind of blah, right? Too much brown. And that breaker box on the wall is an eyesore. I felt like the space needed some color, so I set off in search of inspiration.

I found my inspiration in my Trey Speegle soap set from Anthropologie, and my favorite windowpane scarf. The progression of blues is calming and exciting without being overwhelming. Perfect for the dining room!


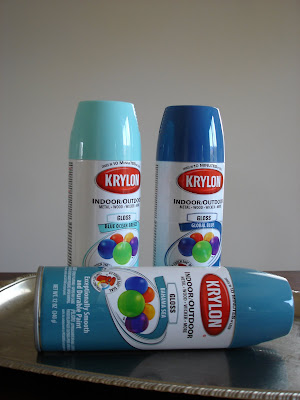
I decided that the since the table is too pretty (and too expensive) to paint, the chairs would get a makeover in hues of blue. We have six chairs, and I purchased three colors of spray paint in Blue Ocean Breeze, Bahama Sea, and Global blue. The Bahama Sea color has a hint of green, for added interest.


Three cans of each color was enough for two chairs and with a few hours of patience, elbow grease,and help from my amazing husband when my trigger finger was tired, the chairs have a fresh new look!


To fix up the corner , I added some thrift finds. A chip-paint table topped with the glass block my mom made for our wedding, a silver tray underneath, and a pretty rattan basket complete with a cute birdie (the perfect place to hold my seeds for planting). Over the fugly breaker box I hung my thrifted 'Girl on Bike' painting to mimic the blues used in the chairs.


The room isn't 100% complete, but looks amazingly bright and fun with just these few simple fixes, don't you think?


I kept the center piece simple; my Bubbie's silver zodiac tray (one of my favorite pieces), little cast iron birdies, their nest, and a vintage sugar bowl and creamer.


I hope you enjoyed the first installment of This {Humble} Home as much as I enjoyed creating it. I'd love to here your thoughts and see pictures of your freshly painted chairs. Expect {Humble} Home projects in the near future!


PS. Don't forget to enter the delicious Nana Cakes Giveaway!